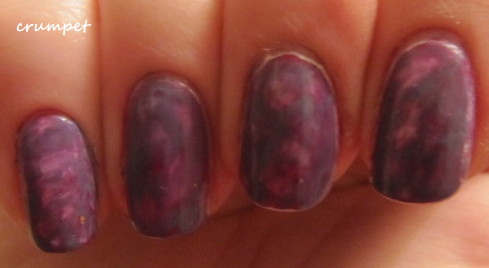
Hi Goddesses
So, watercolour manis are the latest awesomest thing. They look great and the minute I saw one, I went "ooooooooooh" and resolved to do it. Roll on 4 weeks, and I still hadn't done one, until Sarah at Samariums Swatches posted this stunner. Click on her link, because she also links to Sarah Chalkboard's wonderful version as well as Rebecca's essential tutorial.
In brief, Watercolour manis involve using 2 coats of white, a top coat, and then dabbing on dots of colour. You start with 1 colour and then spread it around the nail using a brush dipped in acetone. Sounds simple ?? Yeh right, welcome to the Crumpet version :/
When I first did this on Sunday night I was soooooo disappointed, but the more I've worn it, the more I've loved it, so -
The Things I've Learnt
Read Rebecca's Tutorial. And then read it again so that you don't get it wrong. It was only afterwards when I was wondering why mine looked different that I re-read it slowly enough to absorb that you don't have to do your subsequent colours over the whole nail. Doh.
The colour blend is essential. You need to use colours that will work well together, a bit like when you choose the colours for a watermarble. For this I used mostly CGs - Traffic Jam, Secret Peri-wink-le, and Urban Night - and OPI Planks A Lot
work out at the start which colour will look best on top as the last colour.
DON'T try to brush the watered down colours all over the nail to hide the white - it makes clean up a BITCH.
vary how much acetone is on your brush to vary the effect
What I LOVE About It
I'm mad for designs that look like chaos, or where there is no discernible right or wrong. It's why I love splatters, and why I love water marbles. It's all in the randomness.
the beautiful swirlage of colour - how pretty is this??!!!??
it really doesn't take long to do - certainly less time than a water marble
Things I Didn't Like / That I Would Do Differently Next Time
the white - I hate white nails, and I hate that you can see the white around the edges. Next time, I'm going to use a super pale pastel as the base colour
that I used equal amounts of all colour and washed them ALL over the nail - let Rebecca's tutorial set you right. Basically, apply your subsequent colours with good judgement!
know which colour you want the eye to be drawn to. I was right to do with Urban Night for the base, but I wish Traffic Jam had been the final colour, rather than Planks A Lot
It's fun, it's easy and it's stunning - what are you waiting for ??
Enjoy xx :)


