Monday 31 October 2011

Hallelujah - it's the End of the Hallowe'en Posts!!


Nails I Love


HALLOWE’EN 
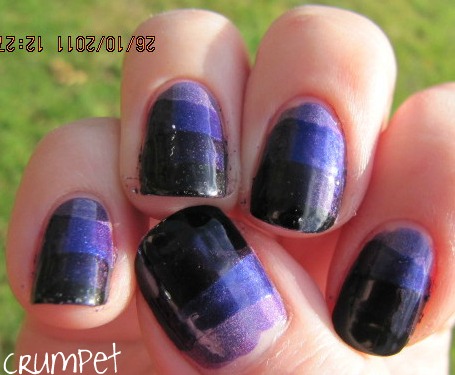
WEEK – Purple Ghost Cats

Hi Goddesses


Welllll, I don’t know about you, but I am so glad it’s Hallowe’en today (or to give it its proper name, All Hallows Eve) because I am all Hallowe’en-nail mani’d out.  There have been some brilliant designs out there, but I am soooo relieved I don’t have to see another pumpkin, ghost or graveyard mani for another year lol.


Now, are you ready, are you sure you’re ready?  I have been overwhelmed by the response to yesterday’s post (10 Basics of Nail Polish –What Every Beginner Should Know), so number one, MASSIVE THANK YOU, especially to Krissi with her kind words and Liz who reposted it on her blog and sent 20 new visitors my way  J  but the main feedback?  You found it FUNNY!  So hold on tight ladies, sarcasm is turned on high!


Let’s start with what’s crap about this mani –
  • The polish wouldn’t photograph for shit lol.  It’s an amazing colour, not at all blue
  • One of my pussycats looks like an owl
  • He also has a weeping eye.  I must have hurt him in the night, because he woke up like that
  • You can’t really tell there’s a bat TIMW on my ring finger
  • This was the night when we almost found out whether Konad could fly.  Seriously, it was *this* close to being thrown out the window
  • But other than that, I love it !!

see, the bottle is a different colour to the nails!!!!!!!!!!!

Lol, I did actually really like this mani, suspicious nail art aside.  The polish is Wet n Wild’s Buffy The Violet Slayer which is an amazingly intense electric violet.  This is like purple on crack, drinking Red Bull and then doing a bungee jump.  It is sooooo full of adrenaline, it’s literally blinding.


I also love that the polish is so intense that it won’t even allow white to be white.  It turned the white LILAC – how cool is that?  Made the whole spectral ghosty thing muuuch easier J


So the owl / cat, bless him.  I really wanted to do pussycats for Hallowe’en cos I do love cats, but I also Cannot Draw.  Then on Picnik they had a really cool doodle of a cat that was basically a blob with 2 eyes, and I thought, “I can do that!  I can draw a blob! How hard can a blob be???!!!”  Turns out, way harder than I thought :\   But I do find him really cute, even though poor love we have no idea what sort of animal he is!


The middle fingered cat? I’d go so far as to say he’s not bad.  Definitely a cat.  Not that you see any cats with oval heads and string necks, but still, he’s a cat.  And the paw.  The paw works.  Unless I got the number of toes wrong.


I thought it would be funny / clever to get a bat Tangled In My Web, and as I Cannot Draw, I used a sticker that I got as a free gift, except with all the glitter, you can’t see him!


But the real grrrr I save for Gothic Hello Kitty on the index finger that had to be trimmed to below the nub because of my hideous nail split.  First Konad session went ok.  This was the 2nd session.  I tried 12 times to get this stupid Kitty to print.  Now, if I haven’t mentioned it before, I am not a woman of saintly (or any other kind of) patience.  If something doesn’t work straight away, I am not the sort to inhale deeply, exhale calmly and try again with a smile on my face.

12 times!! 12 times I put the polish on, scraped it off, and did it go onto the stampy thing?  No It Did Not!  Aaarrgghh.  Eventually I reread the comment someone had made on that night’s PAA post about being LIGHTNING fast because the polish dries v quickly.  Now asking me to be lightning fast at anything is like asking a slug to beat Usain Bolt in the 100m, but I did (and somehow I managed to not knock my bottle over – miracle!!) and ta-dah … one slightly lop-sided Kitty.


So, to sum up, thank **** this is the last Hallowe’en post of the year lol. 

I hope you’ve enjoyed J   xxx


J

Top Tip – if you’re ever unsure what a nail colour looks like, go to Google images, which will give you plenty of contrasts and compares.

Sunday 30 October 2011

Hallowe'en Week - Bloooooooood Water Marble


Nails I Love


HALLOWE’EN WEEK – Blood Water Marble

Hi Goddesses


So, I’ve become a little obsessed with water marbling of late, and am getting in the habit of doing one every Sunday night so it becomes My Monday Marble Mani lol – mmmm that sounds good lol – and I hit on this idea for Hallowe’en, but would have probably thought of it eventually anyway, with red being one of my favourite colours.


I am finding lately that I no longer count sheep, and that my favourite falling asleep (or actually NOT falling asleep) trick is to think of colours that would work well together for marbling or other art.  Shheeeesh – something’s a little loose in this head!


Unfortunately, this one wasn’t as easy as you’d think – I found it very hard to find a lighter red that didn’t go pink in the water.  You should have seen my first bullseye!  There was pink and purple and every shade in between, lol but bugger me, there wasn’t any red!


Eventually I settled on OPI Vodka and Caviar, as it just behaved better than the others, Color Club Red-ical Gypsy for the vampy red and OPI Boris & Natasha (one of my very favourites) for the burgundy red / dried blood.


As I said, I really love water marbling.  I think it’s something about not knowing what I’m going to end up with – it mystifies me how Colette can get every nail looking pretty much the same.  How does she do that ??  Who knows, but I find water marbles more beautiful than anything else, they really hypnotise me.


As is often the case, it’s the index and middle finger on the left hand that I love the most.  This is the 2nd set of nails that I do, so I assume it’s better cos I learn from what didn’t work out on the thumb!  As always, there was one particularly gorgeous pattern that ended up on the tape – gggrrr, Must Place Nail Better!


Really loved wearing this.  Maybe it doesn’t look that much like blood after all, but it sure was pretty J

Enjoy xxx J

J

Top Tip – if you’re ever unsure what a nail colour looks like, go to Google images, which will give you plenty of contrasts and compares.

Yummy Mummy May I


Nails I Love

CHINA GLAZE – Mummy May I

Hi Goddesses


Mummy May I has long been at the top of my list of favourite polishes.  There’s just something about it that is simultaneously simple and special.


This reminds me of a spooky blackcurrant jelly!  The base is a beautiful browny purple, which is then littered with specks of violet micro glitter.  Unlike its sister, FORTUNE TELLER, the glitter is all the same size, but no less dramatic for that.


In the bottle, Mummy May I is super pretty, devilish and full of voodoo.  Put it on the nail, and this looks like blackcurrant crush, the clash of the bruised skin mixing with the sweet inner juices.


There is a slight jellyish quality to this polish, and the first layer goes on worryingly sheer (but then the 2nd coat goes on really thick, go figure!) but that just adds to the squished quality of the colour.  This is like purple hearts exploded and were then mixed into the polish, and now they bloom and beat violet, begging for mercy.


This is no longer my all time favourite polish, but it’s still a Top 10-er.  As a purple whore, it ticks so many of my boxes – shiny, speckled, 2 things going on at once, dark, magical, witchy, decadent …. I do love this so.


I am disappointed in my photos though.  Whilst I have given myself a round of applause for not needing to cover up any messiness with my logo lol, I don’t think my photos are as good as the ones Captivating Claws and Trace Face Files took recently – they did a much better job of capturing the purple base.  Ho hum, can’t win em all!

Enjoy J


J

Top Tip – if you’re ever unsure what a nail colour looks like, go to Google images, which will give you plenty of contrasts and compares.

The 10 Basics of Nail Polish - What Every Beginner Should Know


10 Things

10 Things Every Girl Who Polishes Needs to Consider

Hi Goddesses

So, we all start somewhere, and I shocked myself the other day when I realised I’ve only really being doing this for about 3 months and 1 week!  Really ? it feels like FOREVER and I can’t imagine that less than 6 months ago I talked and obsessed about things other than nail varnish lol.

Some of my most successful blog posts have been the “10 Things You Need To Know About Nail Polish” series (here and here ), so I thought I’d do a slightly different version, starting with what I wish I’d learnt, and the order in which I probably needed it.  For some of you, it will be a walk down Nostalgia Lane, for others, it might save you some of the mistakes we’ve all made along the way.


Base Coat

  • ·         You NEED a base coat.  Simple as.  Full stop.  No arguments.
  • ·         Why?  Well, it helps protect your nail from staining, and it helps your polish stay intact and not chip.  Remember, avoiding chipping is the Holy Grail J
  • ·         There are loads to choose from, and this is one of the areas where you really will need to find the one that works best for you.
  • ·         Ones I’ve tried – Zoya Anchor, OPI base coat, OPI Nail Envy.  The latter is the one that really works for me, I use their Sensitive & Peeling version, and I *can* feel a difference in my nails.  I’ve also bought some CND Stickey to try – other girls swear by this for keeping your mani intact.  I’ve also heard good things about using a ridge filler as a base coat, but I haven’t tried it yet


Top Coat

  • ·         You NEED top coat.  Maybe not quite in the same way you need base coat, but if you want to give your mani the best chance of lasting, you NEED top coat.  It also seals it all together, and a good one makes your whole mani dry, so that you can start using those hand thingies again.
  • ·         Aren’t they all the same ?  Noooooo.  And again, they vary from person to person.  What works for you will not work for someone else. 
  • ·         Personally, I prefer POSHE, a US brand.  It dries quickly and it gives so much shine.  You can almost see your face in it.
  • ·         But Crumpet, they all dry quickly.  Ha ha, bless, you’re so new.  No.  They don’t.  Some do and are awesome, but every now and then, you’ll get caught out by one that doesn’t dry fast and it will all smudge.  I also love OPI Rapid Dry top coat.  Most bloggers swear by Seche Vite, but this gives me what they call “shrinkage”, where the nail varnish *shrinks* away from the edge, leaving a tiny bit of nail visible.  You want to AVOID any top coats that do this to your nails.


Nail Remover

  • ·         There are basically 2 ways to remove nail polish – acetone remover, or acetone-free remover.
  • ·         Wisdom suggests acetone-free is better for you, because acetone can dry out your skin.  However …. that’s like saying low-fat is better for you than full-fat, when we all know damn well it’s not going to taste as good.  L
  • ·         The ONLY nail remover I use is Zoya Remove.  It leaves your nails feeling beautifully conditioned and undamaged, and strong.
  • ·         And …?  Yes, it comes in an amazing pump bottle thing J


Colour Within The Lines
  • ·         Ok, this is like me, an English person, trying to teach the French how to speak French.  I SUCK at colouring within the lines.  That’s not to say I don’t understand how to do it ….no, my execution just sucks (probably because I am Miss Impatient, but I AM getting better).
  • ·         So here’s what I’ve learnt: contrary to popular belief (aka Crumpet Law) it is not the task of the Goddess to lawpse and spread the polish around the nail like you’re emulsioning a wall.  It is NOT mandatory to push it into every nook and cranny, and therefore puddle your cuticles and flood the area between the side of your nail and the skin until it is totally filled in and flat!
  • ·         No, what’s harder, but much more beautiful, is this.  Do not overfill your brush.  Try to leave a 1mm edge all around your nail, thus reducing opportunities for flooding.
  • ·         I am trying very hard to perfect the latter.  To do this, I have had to learn to breeeeathe, not rush, take allllllll the time in the world, stick my tongue out slightly as it improves concentration, and use the polish as sparingly as if it were gold dust.
  • ·         What I find really funny is this – I NEVER colour outside the lines with Glitter Gal.  It’s as if my subconscious knows how expensive it is and slows my hand down.  Lol. 


Wrap Your Tips
  • ·         Come again?
  • ·         Wrap.  Your.  Tips.  This means that when you do your first coat of colour, and your top coat, brush on the flat edge of your nail, but not underneath your nail.  This helps seal the whole mani and make it more resistant to chipping.  It makes sense – it’s easy to peel Sellotape off an edge, not so easy when it’s wrapped round the corner ….
  • ·         Penny drops.  J


Clean Up

  • ·         So, when you’re a mucky pup like me, you need a good clean up routine.  Admittedly, the normal person will only ever in a lifetime use 1/10th of what I use in an afternoon, but …you get the point.
  • ·         Pour some of your chosen nail remover – ie Zoya Remove – into a smaller bottle and keep this to one side for clean ups.  Next, buy a selection of corrector pens, cotton buds, cocktail sticks and brushes, and find out what works best for you!
  • ·         Most professionals prefer the brush.  I find this only works when my brush is stiff, and because I make a lot of mess, usually by about nail 6, the bristles have gone quite floppy and it’s hard to brush the excess away.
  • ·         I’m a big believer of “letting the remover do all the work”  (see a little bit later) and so I prefer to press a cotton bud to the area of mass flooding.
  • ·         Be careful tho – dark, vampy colours smear, so try not to “rub” them, and try not to smear remover everywhere.  I prefer to hold the cotton bud in place for 5-10 seconds, and just let the colour lift off.
  • ·         Also, if you’ve just made a teeny smidge of a mess, or it’s glitter, use a cocktail stick.  It can be dry – it’s just a great “prod n wipe” tool, and as it’s so thin and pointy, can really help lift the tricky stuff.


Removing It

  • ·         So, you’ve bought Zoya Remove and now you’re thinking, “what the hell does she mean, let the remover do the work”.  Most professionals swear by this, and Deborah Lippmann told me herself (indirectly, when she was being secretly filmed at a trade show).
  • ·         To remove my polish, I like to use square pads that are about 2 or 3 inches square.  I douse an area, press it to my nail, wrap it up like a swaddled baby with the bits of the pad I’m not using, sing a Katy Perry song for oooh 30 seconds and then… .. ..oh my god, you mean, it just Wipes Off ?  Without you having to do any work?  Amazing!
  • ·         It’s super easy, super quick, less damage to your nails (no sawing motion) and stops any smearing (especially with vampy colours).  Some people like to tear their square pad up into tiny chunks and have all 10 nails defrosting at the same time.  I prefer not to do this, but I do always have 2 mummy wraps on the go.
  • ·         This also works for glitter – just leave it longer – say 2-3 mins.  You’ll feel straight away, the minute you try to move the pad, whether it’s worked.  If it has, the pad will just pull away from the nail, taking the glitter with it; if it hasn’t, you’ll feel the tug as the wool sticks to the polish, in which case just rewet and resoak.
  • ·         Some people use the foil method.  This is almost exactly the same as the above, except they wrap each swaddle in tin foil afterwards, to keep it moist and accelerate the process.  I don’t use it purely because I’m happy with how long my method takes and the results I get with it.  Besides, I’ve already got enough crap in my nail room lol.
  • ·         The WORST thing you can do, especially with a glitter, is sit there rubbing at it for half an hour until you get cramp, which is what happened to me the first time I wore Deborah Lippmann.  Not only does this Really Hurt, but it puts you off using glitter, which is the 2nd best thing God ever made for women after chocolate.


What Are The Best Brands

  • ·         When it comes to putting colour on your nails, choose what works for you.  When I started, I was a nail polish snob, and would only use OPI and Zoya.  However, that snobbery came at a price, because although those 2 brands are magnificent, neither of them are cutting edge, cool, or pushing the envelope of what is possible with a polish.  So now I use all sorts of brands and would encourage you to do the same.
  • ·         I do however have just 2 words of caution.  Well, 2 thoughts, not words.  Again, what works for one person will not work for another.  A lot of people love Orly.  On me it’s thin and chips as soon as I’m not looking.  Likewise, I think Zoya rocks, but loads of people experience problems with it, or get shrinkage.  So, learn what works for you.
  • ·         Next – it’s ok to do cheap, but never do cheap AND nasty.  And we ALL know what I’m talking about here.  You can grab some real bargains but try to stay away from polishes that are so cheap they must be at least partially carcinogenic and have been tested on fluffy animals.  Speaking of which ..


Big 3 Free
  • ·         3-free is nail polish’s equivalent of low fat, or low carb.  It’s basically polish with the bad things taken out.  The bad things were toluene, formaldehyde, DBP (phthalates) and they have been linked to nasty health problems.
  • ·         All the “better” brands are 3-Free, and I do personally view it as the sign of a respectable nail polish brand.  I imagine it is cheaper to make the polishes with the nasty stuff in, so that’s another reason I steer away from the cheap stuff.
  • ·         3-Free though is not the same as cruelty free.  Most of the better brands do not test on animals, and although some of the individual brands don’t, the larger cosmetics giants they are part of do.  You can read a good article on it here 


And finally …
  • ·         Oh my God are we at number 10 already, Crumpet we were having so much fun!
  • ·         Well, that is exactly the point I want to make with number 10.  Nail polish is fun.  Looking for colours is fun.  Finding out what colours work for you is fun.  Learning how to splatter and marble and do gradients – it’s all fun.
  • ·         The minute your mani becomes a chore or something you “have” to do ?  STOP DOING IT.
  • ·         Until then, keep polishing and keep enjoying it.  And keep reading me and the other bloggers, because it’s people like you who help us feel less alone in our obsession bubbles.


Enjoy – always xx  J


J

Top Tip – if you’re ever unsure what a nail colour looks like, go to Google images, which will give you plenty of contrasts and compares.

Hallowe'en Week - Purple Witches Tights!


Nails I Love


HALLOWE’EN WEEK – Witches Tights

Hi Goddesses


I have a great mani for you today – it’s basically a taped mani (my first proper one where I attempted straight lines) in darkening shades of purple that eventually end in a stripe of black.  It’s a mani I would have wanted to do anyway, but it also reminded me of the tights a witch might wear lol.


The colours here started with a base of China Glaze LOL, a medium to dark purple holo.  I only started with this cos I was swatching it anyway!  Then we have a NYX electric blurple called Midnight Amethyst, the amazing Ready to Pounce from Wet n Wild’s On The Prowl Collection, and finally, SH Black Out.


You’ll need to be gentle with my first attempt, but it’s not too bad.  I didn’t quite get the polish to the sides of the nail, so I ended up doing something refilling with a thin dotting tool, just to level the stripes out.


I really love this combination – Ombre Striped Gradient? – and I can see it working well with a lot of colours.  The Ready To Pounce is really hard to photograph, and it’s only in the sunshine pics that you can really tell there are 4 stripes.


I then wanted to go one step further, and what better glitter to use at Hallowe’en than NOPI Pitch-Black Glimmer, which is literally coal dust in a bottle.  I love the overall effect this added – almost like black sparkly cobwebs.

Enjoy – I am saving the best for last tomorrow, and it involves a LOT of blood J

Top Tip – if you’re ever unsure what a nail colour looks like, go to Google images, which will give you plenty of contrasts and compares.

Related Posts Plugin for WordPress, Blogger...
Blogging tips