Hi Goddesses
I hope you're all well and Hump Day is treating you well :) I'm going to try something slightly different today, and if it works, I'll look to do it once a week. It's a not quite tutorial of how a mani gets created, layer by layer, and hopefully you'll find it useful. I'd really appreciate comments, good or bad!
So, today's Summer Challenge is Pink and Purple and I had 100000000000 ideas. I even did a mani for this challenge called Pink Parrots, but that will have to wait for next week :) So why did I end up changing it and doing another? Welllll because some Zoyas arrived lol, Kimber and Carly from the Surf n Turf Collection. So, let's take it slow.....
This started with 2 coats of Kimber, a salmony shimmery pink, full of warmth and with that secret glow to make it special. Just paint your nails as you would for a normal mani. If you do all the steps I show you, but on different days, you could get 4 total looks out of this mani.
I then sponged on Carly. Carly is lovely. Carly quite gorgeous. Carly a little metallic but oh so mmmmm. Look at all that texture and shimmer.
I only put Carly on my sponge, and dabbed the excess off. First of all, you want to apply it to your nail where you want it to be darkest, and then work backwards to where you want it to look more blended - that way, if there's still excess on your sponge, you won't create a massively noticeable "colour block" style gradient :)
I applied the sponging twice, with a smooth make up sponge. Please excuse the little bits of sponge sitting so prettily on my nail - this is because I was being Scrooge-like with the Zoya, and the sponge got too dry. I haven't tried it yet, but a lot of people wet their sponge before they start to keep it moist, and I might give this a try.
Top tip from Nail Nerd - if your gradient doesn't look smooth enough, dab back over the blend line with the first colour, and you can smooth them together.
So far, so pretty. I then copied Nicole from Polish Wars who applied a holographic top coat to her gradient. Voila one coat of HITS Hefesto.
I like this and I don't like it at the same time. Part of me prefers the gradient before the holo, but I love the sugary fruit pastille look the holo gives. It gives it a really other-worldly quality.
So, so far you have 3 manis. Kimber. Gradient. And holo gradient.
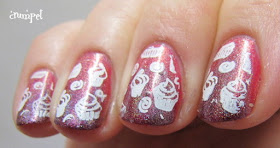
Finally, I stamped, using my new DRK-B plate and my trusty Konad white. I decided to go for a "sugary" type of pattern to match the base I had created.
So this is Zoya holo gradient cupcake nails lol. Wow, so catchy.
I hope you enjoyed that style of post - please let me know if it's the sort of thing you want to see more of.
Enjoy xx :)


